Crafting Gorgeous Handmade Goodies!

Saturday, September 12, 2015

Sew Over It Dressmaking Weekend - Circle Skirt


I have been trying to learn how to sew for the past few months and have succeeded in sewing a few bags and purses but my efforts at dressmaking have not turned out well. For this reason I signed up for a dressmaking class at Sew Over It The class I did was the dressmaking weekend. Saturday was devoted to make the circle skirt pictured above and  Sunday to make a shift dress. I have yet to take some pictures of that but wanted to upload what I had.

I arrived bright an early at Sew Over It's dressmaking shop and studio.The shop is really lovely and really inspires you to pick up sewing. I was glad so take some pictures.
The outside is painted this pretty pastel lilac.


Inside it has one section which is the shop. It has loads of fabric and haberdashery. Different laces,zips,threads and buttons.


The other section is devoted to a sewing studio. Big tables,lots of natural light, tea and cake. What more can one need?
We spent our first 15 mins or so going over the fabrics we had got with us and supplementing with extra things from the shop. Then we steamed our fabric and were ready to go. I really loved the instruction and the pace of the class. Our teacher was really helpful and went over everything in detail. I never realised the precision and thought which goes into just pinning the pattern on the fabric.


I took a well deserved tea break at this stage and there was a loaf of lemon cake for the students which was highly appreciated by all the students.


We were done by around 5 and I was so proud of my first successful dressmaking project. I love this skirt and wore it a lot over the summer.

I will definitely go back to do another dressmaking class here. They do a lot of different classes every month ..


SHARE:

Mr Owl


Really loved the latest issue of LGC. I was so excited when I got my hands on this issue. The only problem is this pattern used all my yarn and I had no left over to make the mouse. I need to trawl through my stash to make the other patterns from this issue.

The one thing with this pattern was that I did kind of run out of yarn towards the end. This could be because I have a loose hand at crochet so I think this might have led to using up more yarn then expected. I did have a problem with seamless color changes on rows for the body and hat. I did try different things but could not save it. I do want to go back to an older issue of LGC and try my hand at the chameleon pattern which had many color changes as well. I do need to learn how to do that.
I loved the cute hat on this one as well.


SHARE:

Crochet Circle Vest


This is the first time I attempted a garment and I gathered enough courage to make this because I thought crochet would be quick and I was using a chunky yarn. I used a Bonus Chunky Yarn from Sirdar in colors apricot and duck egg. I bought the yarn from Hobby Craft and took a pattern from beacrafter.com. I must say it took me around 3 weeks to make and it was really difficult to keep motivation. I am so used to making toys,hats and cowls that keeping at it after the first couple of days took a lot of drive. The end result is totally worth it though. I love looking at patterns for knitted or crocheted garments on pinterest but always get daunted by the amount of time and effort not to mention expertise it will require to make a garment. This pattern was really easy though and at the end of it I was so proud of my achievement. I will at some point make another garment but for now I am just basking in the pride of finally making a vest.


SHARE:

Bobble Stitch Cowl


I had yarn left over from a hat and since I have a tendency to get a cold nose, I thought of making a cowl using crochet. I wanted to make a crocodile stitch crochet cowl to begin with but after trying a couple of rows, I realised that the color variation in the yarn was not giving enough stitch definition. I could hardly make out the crocodile stitch. This could also be because of my first attempt at crocodile stitch was not that amazing. Must try it later again with another yarn.

Back to the bobble stitch, I looked up some tutorials and came across this lovely tutorial. What a lovely tutorial and such pretty colors. This totally convinced me to try it out on the cowl. I used a 31 stitch cast on and started this cowl in a cafe. I did not realise how much yarn this stitch takes. I ran out of yarn and had to substitute an acid pink DK yarn leftover from my stash.


I think the pink helps add a bit more zing to this. I really loved the end product. It is a very stretchy, comfy and warm cowl. I have been wearing it for the past week and it is a great easy make. I highly recommend everyone to try making it.


SHARE:

Tuesday, August 25, 2015

Mr Hedgehog

http://www.letsknit.co.uk

First time using eyelash yarn! Such a cool fuzzy toy. Made this using the latest issue of Let's Knit
Here is the pattern on ravelry  . It is definitely a fun make and great for starting out with eyelash yarn.


Loved this pattern. Keep 'em coming Let's Knit


SHARE:

Luscious Lagoon Beret on straight needles


I made this beret using a pattern from Easy Knitting Weekend . I loved this pattern as it is cast on straight needles . The hat was an easy one and a great weekend make. I used this really lovely DK Robin Paintbox  in Lagoon. I had a 100 gram ball and have loads of yarn left over for a cowl. I will be starting on it soon.


I always use paper clips as markers and they served me well on this project. I am thinking about getting some cute markers from a yarn store soon.


Love how the swirl catches the light.


SHARE:

Sunday, August 16, 2015

Pink Chevron Gloves


Made these gloves from an old issue of LGC. The striped make such a cute pattern.I tried one in the same color and one with different colors alternating. I like both the versions of it. 

This is the first time I tried chevrons and was relieved to find how easy it was to create these. I was really not sure if the gloves will fit or if the thumbs will work but it all turned out perfectly.


SHARE:

Didiji Amigurumi Free Pattern


I designed this crochet doll inspired by my lovely sister. The doll is a typical Indian Did with braids rolled up and tied with ribbons and wearing salwar-kameez and a dupatta. She is also wearing chappals.

I have not written crochet patterns before so please forgive if there are any mistakes.


Materials: DK yarn 50 gm each in the following colors : Beige , Chocolate , Yellow , Pale Green .
2 safety insert eyes. A little yarn in Pink for the hair ties. A little yarn in blue for the sandals/chappals.


Head and Torso:
Using Beige and a 4 mm hook,
Make a magic ring.
Row 1 : 2 dc in each stitch of the  ring. 12sts
Row 2 : (2 dc, 2dc in next st)  to end
Row 3 : (3 dc, 2dc in next st)  to end
Row 4 : (4 dc, 2dc in next st)  to end
Row 5 : (5 dc, 2dc in next st)  to end
Row 6 - 9 : 1 dc in each st to end
Insert Safety Eyes 6-7 sts apart at row 7.

Row 10 :(dc2tog, 5 dc) to end
Row 11 :(dc2tog, 4 dc) to end
Row 12 :(dc2tog, 3 dc) to end
Row 13 :(dc2tog, 2 dc) to end
Row 14 :dc2tog to end
Row 15-16 : 1 dc in each st to end
Row 17 : 2dc in each st to end
Change color to Yellow(or whatever color you want to use for kurti)
Row 18-21 : 1 dc in each st to end

In the next row we need to create the slits in the kurti at the sides. For this we need to crochet in front loops only.
Row 22 :1 dc in front loop only for 6 sts.
Row 23: 1chain, turn, 1 dc in each of the 6 dc made in previous row.
Row 24: 1 chain, turn, 1 dc in each of the 6 dc made in previous row. Fasten off.This makes the front flap part of the kurti.


Row 25-27:Join  yellow yarn at the the 7th st of row 22. Now we need to repeat Row 22-24 starting at the point where the first flap was divided. This will create the back flap.

Sleeve/Arm:Make Two
Starting with Yellow (Kurti Color)
Make a magic ring.
Row 1:1 dc in each st to end
Change color to Beige
Row 2: working in back loop only, 1 dc in each st to end
Row 3-5 : 1 dc in each st to end. Fasten off

Dupatta(the scarf on the top) : Make Two
Starting with Pale Green
Row 1 : chain 25
Row 2 : 1 dc in each st
 Fasten off

Salwar (Pants) :
Starting with Pale Green

Row 1 : chain 12 join with slip st in a round
Row 2 : 1 dc in each st to end
Row 3 : (1 dc in each st) 3 times, then, dc across to the other side this will divide the ring into two pant legs.(1 dc in each st) 3 times. This will now make a circle of 7 sts. Continuing dc around in this will then make the first pant leg.
Row 4 - 6 : 1 dc in each st to end
Row 7 : dc2tog in each st to end.Fasten off.
Row 8: Join yarn at the 4 st on Row 3 from the point where the first pant leg was divided. (1 dc in each st) 3 times , then , dc across to the other side , (1 dc in each st) 3 times. This will make the starting point for the second pant leg.
Row 9-11 : 1 dc in each st to end
Row 12 : dc2tog in each st to end. Fasten off.


Feet: make two
Starting with Beige
Make a magic ring
Row 1 : 1 dc in each st to end. Fasten off

Braids for the side of the head:Make two
Using chocolate brown, chain 25.

 The different pieces before assembly:


To Make Up:
Stuff the head/torso with toy filling. Also fill the two pant legs of the bottom and then stitch the pants to the back loops of row 22 of the head/torso. Attach the arms and feet. For the Dupatta(scarf) sew one of the two pieces to the middle of the torso on row 20 at a slight angle and then sew it at the shoulder and at the back with a single stitch to keep it in place.Do the same for the other Dupatta piece overlapping on the front. The two pieces should make a V at the front and go over each of the shoulders. Using blue thread embroider the Chappals(sandals) on the feet.

For Hair:
Sew two big loops in chocolate brown at the center parting from top of the head to the back of the head. Starting on the side of the head, loop in the yarn at the middle parting and sew back towards ears.Here is an image to illustrate the process:

Once this is done on both sides,take the 25 chain chocolate braid and fold it on itself and attach on each side of head. Use a bright color, I used Pink, to make ribbons to tie on the side of the head.


SHARE:

Mandala the blues away!


Made this mandala again from a pattern by LGC issue 66. This was great to learn the puffy crochet stitch and it makes a lovely coaster as well. I love the colors from this issue and the ocean blue with the sea green looks so pretty.
SHARE:

First Blanket Ever!

 I have not made a blanket and was really worried it might be a really big project and I will loose interest. Then LGC started this crochet along in 3 issues and it was really the perfect opportunity to blanket away. The pattern was really great fun and very interesting. It taught me so many different crochet stitches.

 I really loved these waves in blue white and yellow. Someday when I have more time and patience I would love to make these waves into a separate blanket.


The finished blanket:

SHARE:

Sampler Cowl


My husband gifted me this book on my birthday and I wanted to try out some of the simpler stitches.
I had bought some fabulous striped rainbow yarn at a craft fair and gave it a go with a few of the different stitches and it turned out ok. I might do this again with some other stitches as the effect is really lovely and the cowl is much easier to wear than a scarf.
SHARE:

Helmet Head


On a visit to John Lewis I saw a really great pattern leaflet for hats using chunky wool and that too on straight needles. The patterns suggested using Sirdar Kiko SuperChunky Yarn and I did see it in the store and bought the yarn as well as the pattern. 


I really enjoy making and wearing hats and this one was really a great one to try out ear flaps as well as shaping the top part of the hat. Due to the superchunky yarn it was really a quick knit. I am going to give the other patterns a try as well and update the blog soon. This hat  is a great one for cold and wet winters and I really love how warm my ears are in this hat.
SHARE:

One Bag To Start It All


I made this bag last year from Issue 58 of LGC.
I had been meaning to get back into knitting after many years and saw Let's Get Crafting Magazine with needles and yarn all ready to go. It seemed like the perfect kit to  pick up knitting again. I had not knitted for almost 10 years and was really amazed at how well this bag turned out. This issue started my love for LGC mag. I have been getting every issue since then and I love specially the toys that they feature. This bag was such a great beginners knit. Simple color changes were not too tricky but made the bag so cheerful. Keep it coming LGC!

SHARE:

Tuesday, August 11, 2015

Water Carrier

A bit of free style crochet to create a water cozy to hang by the side of our bed as we do not have a bedside table. The pattern for this was very simple.Starting with a magic ring, I increased stitches until I got a diameter of about 2 inches.Then did trebles for 5 rounds to create this. I will do this more formally someday and write it down to create a free pattern. For now it was great fun to just freestyle my way through it.
SHARE:

Fishermans Rib On Straight Needles


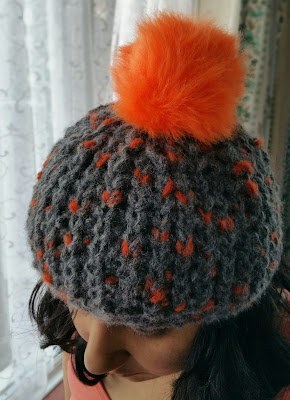
I was so excited that I found the Sirdar Head Start yarn at a discount. I had my eye on this yarn for a while specially since there is a scrumptious pompom and the color is so cheerful and contrasts so well with the grey yarn. I had wanted to try a new knitting technique and the Fisherman's Rib or the Brioche Stitch was top on my list. Now since I wanted to try a complicated stitch I wanted to do it on straight needles. But it took a lot of trawling around the web to find a pattern for a hat on straight needles and that too using the Fisherman's Rib. Here is the pattern I used from the awesome people at yarnspirations.


I had a shaky start but once I understood the pattern and how it works it was relatively easy going. This is still a tricky pattern and I did cheat by just improvising specially at the top of the hat. But it does look like a chunky rib and I am happy with the results.


SHARE:

Wednesday, August 5, 2015

pugly!


Tried my hand at a pug amigurumi. I designed it myself as well. I will refine and test out the pattern some more (the front paws feel too thick) and then upload it as a free pattern for everyone to try out.
SHARE:

Tuesday, August 4, 2015

The Ultimate Beret


 This is my absolute favorite hat out of all the ones I have made so far. I actually lost it on a boat ride in Amsterdam but loved it so much that I remade it. I used Hayfield Bonus Chunky in Red and I used this pattern 
from ravelry. This is an awesome hat. I am going to make more of them in different colors. It is really comfortable and a real style statement.


SHARE:

Square Cozy


Another LGC pattern and my first try at Granny Squares. I did not understand clearly how to bind off each color and how to bind the squares together but it was still a great first Squares project.Since this project I have done more Granny Stripe patterns and even a mandala.. but thats for another post
SHARE:

Messica!

 Amigurumi version of my friend Jessica (she calls the doll Messica :) ) made as a going away present. I mostly designed the pattern myself and looked at this tutorial for doing ami hair.This project was a great creative challenge for me and has inspired me to try my hand at more ami toys. Maybe design some patterns of my own.
This is a little intimidating for me but I do want to give it a try some time.


 I tried to match the dress and hair to Jess and how she dresses up and she was thrilled with it.


SHARE:

Strut away


 Peacocks are such pretty birds. When they spread their wings out they look so regal. I loved this pattern from LGC and from the moment I saw it in the sneek peek preview I fell in love with it. I learnt some really neat tricks while making the back wings and the cute colors were perfect for it.

I really did like the way the eyes were designed in this pattern as they really give him an individual look setting him apart from other amigurumi birds. A cute,fun make.

SHARE:

Texture this...


I have been meaning to try my hand at textured yarns for quite some time but thought they were too expensive for just a trial. I was hoping to invest in some when I had an appropriate project in mind. Then one day on a stroll through Aldi I found this yarn and it was really cheap. So I bought it and knit it flat and joined it together to make a hood. It was not too easy to knit this but it does look cool when I wear it. I think I will stay away from textured yarns for a while now before I give them a go again.
SHARE:

Simple Ribbed Hat


I made this hat for my husband. He likes simple accessories so this is just a simple 4x4 ribbed hat. Again I bought the yarn for this from Loop and it worked perfectly with this hat. It was  a joy to knit and I did learn how to decrease the crown properly and its one of the first hats which I made which actually sits well below the forehead and so protects both the forehead and the ears.
SHARE:

The Three Mice


Another pattern from LGC. I love Amanda Berry and her toy patterns are my absolute favorite. I made the white mice family for some friends who used to have a pet white mouse. I loved this pattern and the colors compliment the pattern so well. I specially like how they all seem to have such character and really look like a family.
SHARE:

Mango Hat

I picked up some lovely mango coloured yarn from a store called LOOP near Angel Station. Loop is a lovely yarn store and they stock a lot of local yarns. They have a great collection of patterns as well and the staff is very knowledgable and helpful. I used a pattern from ravelry for a butterfly hat and it turned out really well. I had bought a bag of multicolored pompoms from HobbyCraft and added one which contrasted well for an extra flourish! I love this hat and wear it often.

SHARE:
Blogger Template Created by pipdig