Crafting Gorgeous Handmade Goodies!

Friday, December 22, 2017

Mithai!

The best think about Indian Festivals is the food and specially the sweets (Mithai). The best sweets are always home made and I still fondly remember the gujiya's my Grandma made in holi or the besan laddoos my Mom made. I do not have the skills to make Indian Sweets in reality but I wanted to try to do them in Amigurumi. So I made a Motichoor Laddoo, a couple of Besan Laddoos, Kaju Katli, Kaju Roll and a Doodh Peda.

  The Motichoor Laddoo has Silver Vark on top, Besan Laddoos with Pistachios stuck on top, Silver coated Kaju Katli, Silver coated Pistachio stuffed Kaju Roll and sweet and simple Milk Peda.


I will be adding free patterns for these cuties soon so you can have a go at them yourself.


#crochet #amigurumi #crochetlove


SHARE:

Potli Purse


Potli literally means a small sack and was traditionally used to carry all kinds of things, gold coins, grains and even clothes. In modern times, the potli purse is a great accessory. It is basically a drawstring bag. I made up this pattern as I went along using cotton yarn that I got from a great yarn store in Paris. I love the beautiful sage green, violet and indigo blue combination and this was a quick and easy make.
I used a knitting doll to make the chord using the indigo yarn and it turned out really well.

I have been using this purse a lot since I made it and it seems to be the perfect size to carry a wallet and phone and a few essentials. Since its made of granny stripes, there are holes so I could line it up but I enjoy the look of things peeping through the holes so for now I am going to leave it like it is.
The pattern is pretty simple, started it off as the usual amigurumi spiral increase and when the base was big enough just started granny striping it. After I got the desired length I just did a few rows of decreases by dc2tog and added a scalloped edge to make it look prettier.

The bright colors in this one really cheer me up!


#crochet #crochetbag #crochetgrannysquare #crochetaccessory
SHARE:

Capelet for the Best Mom in the World!

I wanted to make a smart shawl/cape/poncho for my Mom as a Birthday gift. After trawling the world wide web, I found this absolutely stunning Spring Capelet Pattern on Ravelry by Merri Purdy. 
What I particularly loved about this pattern was that it looked really smart and as my Mom is a professor I thought it would really suit her. In addition, it used the Caron Cake yarn which I had been meaning to try for a while.

I used two yarns for this pattern Cygnet Aran in Cream and Caron Cakes in Red Velvet.

It was great fun making this pattern. Although I have to say Caron Cakes was not as soft as I had expected. I guess its just because it has wool in it. But if I had to reuse Caron Cakes I would probably use the Caron Baby Cakes which I hear is much softer.

It was a fairly straight forward and fast pattern to crochet. I loved how it turned out. I have posted it to my Mom for her Birthday I hope she has a great year ahead!

Love you Mom!


#crochet #crochetcapelet #crochetlove #crochetclothing #handmadeaccessory #caroncakes #cygnetyarns #crochetgirlgang
 
SHARE:

Saturday, December 16, 2017

Indian Amigurumi Series : Malini the Bharatnatyam Dancer


 I have been meaning to get back to amigurumi for a while as I have been busy doing some clothing and accessories for the past few months. I am continuing my Indian Amigurumi Series with this doll inspired by Bharatnatyam dancers. Bharatnatyam is a beautiful Indian dance form and it has really intricate costume and jewellery which perfectly compliments the graceful dance movements.
For people who are not familiar with Bharatnatyam, here is an image from wikipedia on what the costume looks like:


I cannot hope to ever match the details on a real Bharatnatyam costume so this is my interpretation simplifying it considerably. Despite this, there are many separate sections of this pattern and it did take me a long time to get it to look right. I do not think anyone would want to recreate this as it is fairly complicated but I still wanted to write the pattern down for my own record and to keep it as reference for future patterns. I do love how it all turned out.


Crochet Pattern:
Material:
DK Yarn Blue Color 50 grams
DK Yarn Green Color 50 grams
DK Yarn Beige Color 50 grams
DK Yarn Orange Color 50 grams
DK Yarn White Color 50 grams
Fingering Weight Yarn Bronze Color 50 grams
Embroidery Thread Red,Black
30 small silver beads for the anklets
Two 4mm Safety Eyes
4mm and 3.25 mm Crochet Hook
Yarn needle and scissors
Sewing needle and white thread
stitch marker

This is a fairly advanced pattern for me and I had some trouble getting the proportions just right. I did this differently because I stuffed and combined the pieces as I went along. This way I could get the look right in an easier way. This was just my personal preference though. If you would like to remake this doll you might need to adjust things a little bit to make things fit just right. Or even make all the pieces separately and then combine it all together at the end.

This pattern is no longer available for free.I am in the process of setting up my etsy store and will be selling it there.
Thank you!


SHARE:

Wednesday, December 6, 2017

Rainbow Sweater!

 My First Knitted Sweater! It was such a pleasure to knit this. I got the pattern from a baby knits magazine and it was great to use lots of color. I hate the fact that most of the clothing for newborns is pale pastel colors.I love bright hues and when a really close friend was having a baby I was so excited to start on this project. It went really quick and I got it done in less than a week! I am a much slower knitter compared to when I crochet but there is something about the knit weave which works so well for baby wear.

I have sent the sweater to my friend in Canada and hopefully the baby can get to wear this soon!

SHARE:

Thursday, September 28, 2017

Hand knitted Sweaters and Bollywood....

I recently watched the Bollywood film "Tubelight" and although I did not enjoy the film too much,what I did love were the lovely hand knitted sweaters worn by the entire cast. Knitting in India is not as popular as it once was. When I was a child, moms and grandmoms were usually knitting by September to have new sweaters to wear for the winter. My Grandma used to make our school sweaters as well as fun colorful sweaters for me and my brother. Growing up, a handmade sweater was just taken for granted. The moment I saw the handmade vests I was transported back to the time of the clicking of metal needles. My grandma would unroll the shank of yarn and settle it on her knees and then roll it into a ball. I would sometimes ask to do it too. There is something really warm and nostalgic about seeing the handmade stitches on these sweaters. The machine ones are great but when I see someone wearing a handmade sweater I always think someone must love this person a lot to knit them a sweater. Just like my Grandma did for me!

Now whenever I visit home, usually in December, it saddens me to see fewer and fewer people wearing hand made sweaters. So it filled my heart with joy to see the beautiful, intricate and lovely sweaters in this film. I am attaching some screen grabs so that people see what I mean. At a later date, I will try to find free patterns which match these styles a little and update that in the links, for people who want to copy Salman's style.

All images courtesy Kabir Khan Films and Salman Khan Films. I do not intend infringement of any copyright.


SHARE:

Sunday, August 13, 2017

Lotus Cowl :Horn OK Please!


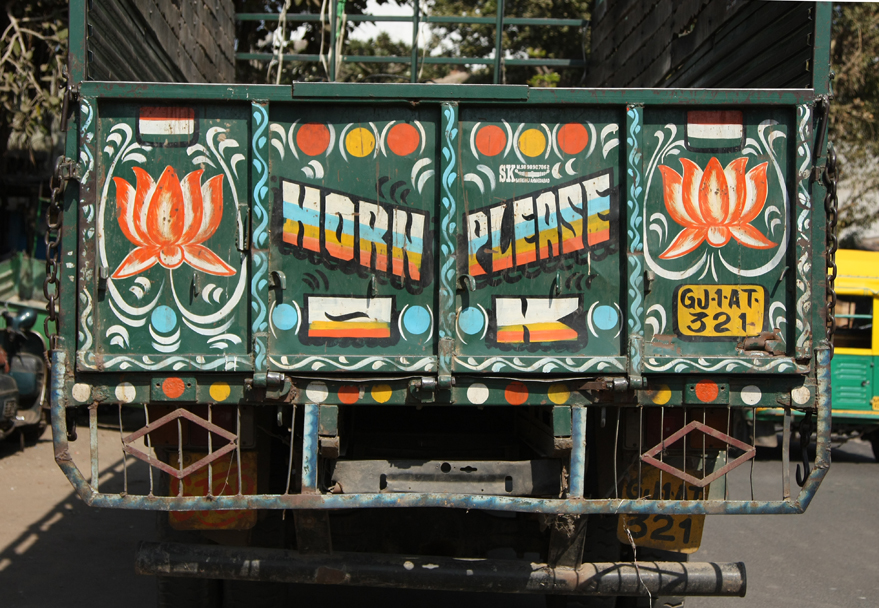
So we are enjoying the summer in London with some bright sunshine this weekend but winter is coming! I wanted to make something really colorful for the coming winter. I took inspiration from the lovely painted trucks that are so easily visible everywhere in India.


Photo credit: Meena Kadri/Flickr.


So I picked bright pink and green to do a play on the Lotus/ Leaves motif. I ordered Stylecraft Special DK in Fiesta  and Kelly Green from the lovely people at LoveCrochet.com. The order arrived in just a few days in a cute fabric bag. I am really impressed by this website and will definitely order from them again.

So back to the pattern. I wanted a pattern with alternating green and pink and to give the look of lotus petals and leaves. After doing several trials with different stitches I zeroed in on this pattern from mypicot.com . This is a really great website for crochet patterns and they are an amazing resource and have a big selection of crochet stitches to try. This pattern worked perfectly for me and I just did a pattern repeat for 6 rows to get 3 rows each of pink and green. I also added a bobble border to it for added fun!


The great thing about this cowl is that it can double up as a headband and the bobble border works really well as a headband too.


SHARE:

Saturday, August 12, 2017

Pug ghungroo! Crochet Coin Purse Free Pattern

I love puns! My husband actually gave me the idea for this one. "Pag ghungroo bandh" is a very popular Bollywood song. It just naturally lent itself to an amigurumi project with a pug wearing bells! I wanted to give it a further twist so I made a coin purse instead!

I used yarn from my stash for this one. The brown one is actually camel yarn that I got from Spittafield Market from a lovely lady who sells some unique yarn. The black one is sparkly black yarn I had left over in my stash. This project is made with Aran weight so it a quick one.

I did line it with some fabric  and added a small handle and a snap fastener.


There are a couple of things that I liked about this project, firstly, the eyes were glass ones that I got from Amazing Craft from their stall at the Ally Pally Craft Fair and I just love the glints on it. It makes the pug look really lively and cute. Also, the bells make a lovely jingle when I carry it around so it makes me happy whenever I use it. The hand strap was a really useful addition and I just wear it like a bangle and this makes it really convenient to carry it around. 


Free Pattern Pug Coin Purse

Material:
Aran yarn Brown Color 50 grams
Aran yarn Black Color 50 grams
5mm Crochet Hook
a pair of amigurumi Eyes
a plastic bear nose
6 bells to attach at the collar
Yarn needle/scissors
stitch marker
For lining: small scrap of fabric,thread and needle,fastener, can use sewing machine to sew the lining but can be hand stitched as well

Abbreviation: (UK Notation)
ch=chain
dc=double crochet
hdc=half double crochet
tr=treble
sl st=slip stitch
sts=stitches

Pattern: 
The pattern is crocheted in a spiral, so its good to use a stitch marker at the beginning of each round to keep track of rounds and stitches. We will need to make two pieces for the head, attach the nose to the front side

Head(make two)
Make a magic circle and 6 dc in the circle.
Row 1:    2 dc in each stitch around (12 sts )
Row 2:    (dc,dc,2dc) repeat 4 times (16 sts )
Row 3:    (dc,dc,dc,2dc) repeat 4 times (20 sts )
Row 4:    (dc,dc,dc,2dc) repeat 5 times (25 sts )
Row 5:    (dc,dc,dc,dc,2dc) repeat 5 times (30 sts )
Row 6:    (dc,dc,dc,dc,dc,2dc) repeat 5 times (35 sts )
Row 7:    (dc,dc,dc,dc,dc,dc,2dc) repeat 5 times (40 sts )
Row 8:    (dc,dc,dc,dc,dc,dc,dc,2dc) repeat 5 times (45 sts )

Nose
Make a magic circle and 6 dc in the circle.
Row 1:    2 dc in each stitch around (12 sts )
Row 2: hdc,hdc,hdc,hdc,tr,tr,tr,tr,hdc,hdc,hdc,hdc (12 sts )
Row 3:(dc,dc,2dc) repeat 4 times (16 sts )
Row 4:    (dc,dc,dc,2dc) repeat 4 times (20 sts )
Row 5:    (dc,dc,dc,dc,2dc) repeat 4 times (24 sts )

Ear: (make two,for each of them, fold it and sew it shut resulting in a triangle shape)
Row 1: 1 ch
Row 2: 2dc in chain, turn. (2sts) 
Row 3: 2dc in each of the 2 sts, turn (4 sts)
Row 4: 2dc,dc,dc,2dc, turn (6sts)
Row 5-7:dc in each st,turn  (6sts)
Row 8:dc2tog,dc,dc,dc2tog (4sts)
Row 9:dc2tog,dc2tog (2sts)
Row 10:dc2tog (1 st)

Fold in half and sew  all around,making  a triangle.

To make up, position the nose piece on one of the head pieces, and sew it in place, sew the plastic nose on top and attach the teddy bear eyes. Sew the ears in place as well. I attached both the head pieces together and made the lining separately and attached it into the purse later, but I think in hindsight it might have been easier to make the lining sew it to the head pieces and then sew the head pieces together. Either way, it should not be tricky to line it.


SHARE:

Raffia Storage Basket :Free Pattern


Hi everyone,  I realise I have not updated my blog for a while. This does not mean I have not been making stuff. I just find crocheting more exciting than writing about what I make. Need to setup a blog schedule to get better at it. Anyway, we have recently moved into a new apartment and this has motivated me to get crafting for the home. I got some RICO Creative Paper yarn from a trip to Hobbycraft and decided to make some baskets using this yarn. There are many patterns for this online already but I wanted to make my own pattern and really just made this up as I went along.
One ball was enough to make one whole basket with a little left over. So I could have made a bigger one. But this one suited my purpose. I use it as a key bowl in my hallway and it was a great way to add some color and make a useful piece at the same time.
It was a really quick one to make and just took me a couple of hours. The yarn is a little tricky to work with but I am sure for people who have a lot of experience with crochet, this could possibly be done in under an hour.

I am thinking of using the left over to make some coasters and the same pattern could be easily modified to do the coasters. I would think just stopping after the first 7 rounds would make a good coaster. I have found working with this yarn a little tricky but its such a versatile material that I think I will continue to use it for coasters/placemats/bags/table runner. Will definitely blog about those as and when it happens.


Material: 
RICO Creative Paper 1 ball
5 mm Crochet Hook
Yarn needle/scissors
stitch marker

Abbreviation: (UK Notation)
ch = chain
dc = double crochet
sl st = slip stitch
sts = stitches

Pattern: 
The pattern is crocheted in a spiral, so its good to use a stitch marker at the beginning of each round to keep track of rounds and stitches.

Make a magic circle and 6 dc in the circle.
Row 1:    2 dc in each stitch around (12 sts )
Row 2:    (dc,dc,2dc) repeat 4 times (16 sts )
Row 3:    (dc,dc,dc,2dc) repeat 4 times (20 sts )
Row 4:    (dc,dc,dc,2dc) repeat 5 times (25 sts )
Row 5:    (dc,dc,dc,dc,2dc) repeat 5 times (30 sts )
Row 6:    (dc,dc,dc,dc,2dc) repeat 6 times (36 sts )
Row 7:    (dc,dc,dc,dc,dc,2dc) repeat 6 times (42 sts )
Row 8:    (dc,dc,dc,dc,dc,2dc) repeat 7 times (49 sts )
Row 9:    (dc,dc,dc,dc,dc,dc,2dc) repeat 7 times (56 sts )
Row 10:  (dc,dc,dc,dc,dc,dc,dc,2dc) repeat 7 times (60 sts )
Row 11-15:  dc in each st around ( add more rows if you want a taller basket)
Row 16: ( sl st, ch 5, skip a st, sl st) 20 times (this makes a cute border for the basket)

Fasten off.

Pattern for Coaster:
Follow pattern for row 1-7 fasten off.

With 1 ball of RICO Creative paper you should be able to make at least a 4 coaster set.

SHARE:

Sunday, April 16, 2017

A Kalash for good luck


c6 http://upload.wikimedia.org/wikipedia/commons/7/7b/Kalash_pujan.jpg

Read more at: http://hindutva.info/the-spiritual-story-behind-the-birth-of-coconut-2/
c6 http://upload.wikimedia.org/wikipedia/commons/7/7b/Kalash_pujan.jpg

Read more at: http://hindutva.info/the-spiritual-story-behind-the-birth-of-coconut-2/
In 2017 I am hoping to use a lot of my stash to do some small amigurumi projects. I want to do quick stash busters with a desi touch and that has led me to this Kalash. A kalash is usually a metal/earthen pot and it is used in religious ceremonies with a few mango leaves and a coconut balanced on top.
It is considered good luck and also bring prosperity. My version is not the traditional colors because I wanted to have some fun with it.


http://upload.wikimedia.org/wikipedia/commons/7/7b/Kalash_pujan.jpg

Read more at: http://hindutva.info/the-spiritual-story-behind-the-birth-of-coconut-2/
 http://upload.wikimedia.org/wikipedia/commons/7/7b/Kalash_pujan.jpg


 I started with the standard pattern for amigurumi to make a sphere then splay it out.I made the leaves separately just starting with a long chain and then do a dc/tc/dc to make the leaves. The coconut on top started out with the usual amigurumi sphere and then decreased quickly to give the tapered shape.
Again this was a quick fun make. I will probably put up a pattern for this when I revisit it and refine the shapes some more. 


http://upload.wikimedia.org/wikipedia/commons/7/7b/Kalash_pujan.jpg

Read more at: http://hindutva.info/the-spiritual-story-behind-the-birth-of-coconut-2/
ttp://upload.wikimedia.org/wikipedia/commons/7/7b/Kalash_pujan.jpg

Read more at: http://hindutva.info/the-spiritual-story-behind-the-birth-of-coconut-2/
ttp://upload.wikimedia.org/wikipedia/commons/7/7b/Kalash_pujan.jpg

Read more at: http://hindutva.info/the-spiritual-story-behind-the-birth-of-coconut-2/
SHARE:

Saturday, April 8, 2017

Of blue saris and Mr India


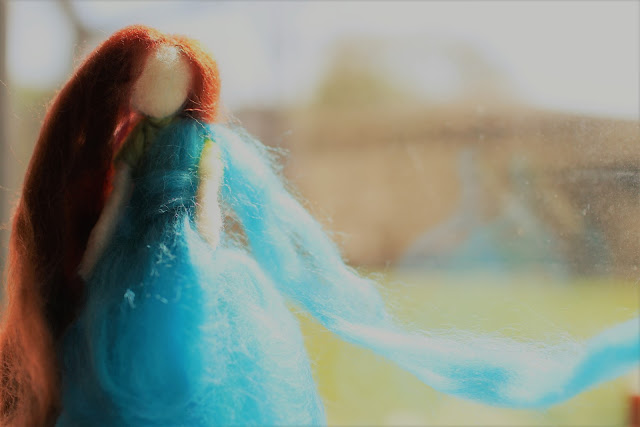
I have recently learned how to do felting and there is something really therapeutic about poking wool with a felting needle. I wanted to make a waldorf inspired doll using felting after seeing some beautiful ones on pinterest. The main point of these dolls is the pose and clothes and colors to convey the emotion as the face is left completely bare. As there are no expressions to read and focus on, the viewer bonds with the finished piece by only looking at the doll as a whole. I enjoyed making this and draping the sari around my doll. The armature is made from pipe cleaners which I got from a local craft store. I got the felt from the Spring Knitting and Stitching show at Kensington Olympia.
Once I had the basic armature in place the doll came together fairly quickly. I love the ethereal feel of this doll. She looks like she might float away if one looked away for even a moment.


I took inspiration from the film Mr India which was released when I was a kid and I really loved it. Although it had all the ingredients of a hindi potboiler, it was amazing to see science fiction in a bollywood film! "Mr India"  went on to become a blockbuster hit and the blue sari clad Sridevi in the song "Kaate nahi kat te" created quite a sensation. I recently saw another filme, "Gundaay" , which was based in the 80s and it had a crucial scene from the film shot while the protagonists were out watching "Mr India" and we get to see them while they are watching the same song. Which goes on to show how iconic this film was for the 80s. Here is a still of the lovely Sridevi from this song:

 That's it for now. I will get down to blogging more frequently. I feel like I do not have much to say usually and whatever I make is probably not as great to be shared. But I will get better at it I do hope.

SHARE:

Tuesday, March 7, 2017

Spring Knitting and Stitching Fair Review


On Saturday I went to the Spring Knitting and Stitching Show at Kensington Olympia. It is a great place to stock up on crafty goodies as well as explore and try out a new craft and chat up with fellow makers. There were some beautiful galleries showcasing embroidery and quilting.

Here are some lovely quilts that I saw on display:


The lovely ladies at The Quilters Guild had an amazing free workshop to create your own quilted square. I did try this out and it was a really fun experience. I do have some experience with the sewing machine but it was good to learn how to properly join the quilt sections together with mathematical precision so that they all join together to make perfect sized quilts. Here is what is the section I stitched together and I am so proud of myself.


There was also a few of the usual Wool stalls. Wool Warehouse, Neil the Knit and Black Sheep Wool. My favourite Mrs Moon was there as well. I do love the lovely chunky wool from Stitch & Story but this time I put a tight budget on myself so did not buy any wool. There is just something about big piles of yarn which gladdens my heart....


What I love about these Craft fairs is the eye candy. So much inspiration all around. I love turning a corner and see a knitted seagull peeking from a yarn tree or an exquisite crocodile stitch shawl. I might not be able to create such lovely creations by myself but I can still admire them....

 
 This fair did seem to have more focus on embroidery and I got to see some really intricate work displayed. There was even a superb crafter doing live embroidered portraits. This is something I did not even think was possible. She was doing some lovely details and I hung around for a while to see her at work.


There was even a Game of Thrones tribute done by the Embroiderers Guild.
I loved the details all around the border of this display and took some close up pictures.This embroidery reminds me of the zardozi style done in India. Usually on wedding lehengas and saris. The mind boggles thinking about the hours spent on making each of these...

There were loads of fabric shops as well and a few selling sewing patterns and notions. I did end up buying some fabric and a pattern for a wrap around pant for the summer. Will blog about it once I make it. The quality and variety of fabric available was awesome. I love looking at the vibrant colors.Took too many pictures but sharing just a few..

SHARE:
Blogger Template Created by pipdig